Tutorial
Make magic with jPregel-aws!

Table of Contents
Introduction to jPregel
jPregel is based on the paper "Pregel: a system for large-scale graph processing."
jPregel's computational model consists of a directed graph (digraph) and may be described as vertex-centric: The graph's vertices are the active elements of a distributed graph algorithm. Every vertex is associated with the same vertex algorithm, encapsulated in its compute method. Attributes associated with each vertex include, but are not limited to:
- a unique identifier
- a value
- a collection of out-edges, each of which has an associated value.
- read messages sent to the vertex from vertices during the previous step;
- modify its state
- send messages to vertices (including itself), each of which is read by the receiving vertex during the next super step.
Example 1.1: Identifying a digraph's source nodes
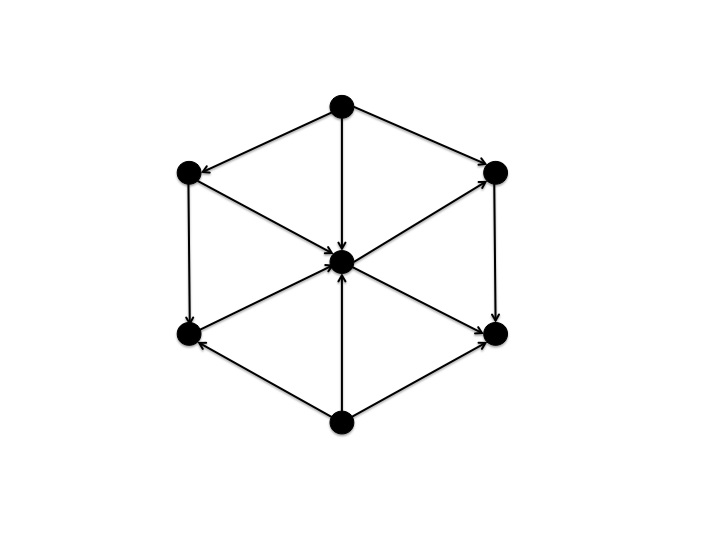
At the time a digraph is constructed, a vertex, v, does not "know" if it has in-edges (i.e., v does not "know" if there is a vertex u with an out-edge to v). Let us define a jpregel algorithm to determine if a vertex is a source (i.e., has no in-edges). We will illustrate our algorithm on the small digraph below:
Algorithm
When the graph is constructed, all vertices are put in the active set and all vertices are initialized as a source. The graph algorithm has 2 super steps:
- Each vertex u sends a message (which is empty) to vertex v, if (u, v) is an out-edge of u.
- Active vertices mark themselves as not being a source.
Correctness
After the graph algorithm terminates,
vertex v is marked as not being a source
if and only if v received at least one message at super step 2
if and only if there is a vertex u with out-edge (u, v)
if and only if v has in-edge (u, v)
if and only if v is not a source.
After the graph computation terminates, there is an output phase. During the output phase of our source identification problem, each vertex outputs true, if it is a source, and false otherwise.
Code
The following code fragment makes these ideas more precise, where the value associated with the vertex is a Boolean, which, after the graph algorithm terminates, has a value of true if and only if the vertex is a source.
	    @Override
	    public void compute()
	    {
	        if ( null == getVertexValue() ) {
	            setVertexValue( true ); // initially mark all vertices as sources

	            // for each out-edge (u, v), send a message to vertex v
	            for ( Integer targetVertexId : getEdgeTargets() ) {
	                sendMessage( targetVertexId, new Message( null, null ) );
	            }
	        }
	        else if ( getMessageQ().size() > 0 ) {
	                setVertexValue( false ); // I have at least 1 in-edge!
	        }
	    }

	    @Override
	    public String output() { return getVertexId() + " " + getVertexValue(); }
Vertex methods getVertexValue, setVertexValue, getEdgeTargets, sendMessage, and getMessageQ do what their names suggest. The full Vertex API is presented a bit later in the tutorial.
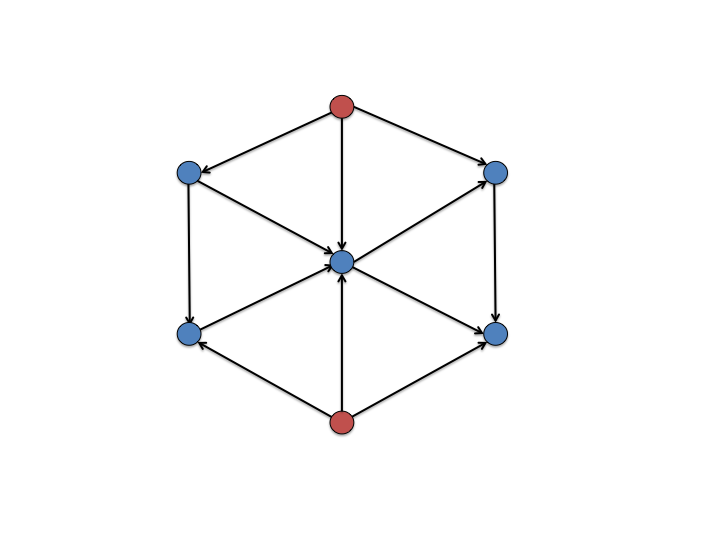
Using the output from this jPregel application, if one were to paint the source vertices red and the non-source vertices blue, our small graph would, of course, look as follows:
In the chapters of this tutorial, you will learn how to develop jPregel applications, how to deploy them, especially on AWS, which we have endeavored to make as easy as possible (we think you'll agree), and how to contribute to this project.